
When I first tried to grow new jade plants from cuttings, I made so many mistakes. I cut stems at the wrong spots, I didn’t let them dry, and I planted them too soon. Most of my cuttings failed. But after years of practice, I’ve learned the right ways to cut jade plants for successful propagation.
Now, I can turn one jade plant into many new plants with ease. It feels like magic to watch a small cutting grow roots and turn into a whole new plant. The best part? It costs nothing but a little time and care.
In this guide, I’ll share exactly how to cut your jade plant for propagation. I’ll cover when to do it, where to cut, and how to care for your cuttings. Let’s turn you into a jade plant propagation expert!
Table of Contents
Why Propagate Jade Plants?
Before we jump into cutting techniques, let’s talk about why you might want to propagate your jade plant in the first place.
First, jade plants (Crassula ovata) make perfect gifts. Who wouldn’t want a cute little succulent that’s easy to care for? When you can create these gifts for free from your existing plant, it’s a win-win.
Also, propagation helps rejuvenate older plants. As jade plants age, they can get leggy or lose their compact shape. Cutting them back and rooting the cuttings gives you new, fresh plants.
Furthermore, it’s a great way to save a damaged plant. If your jade gets knocked over or breaks, those broken pieces don’t have to go to waste. They can become new plants!
Lastly, there’s just something deeply satisfying about watching a small cutting grow into a full plant. It connects you to the natural cycle of growth in a hands-on way.
I started propagating my jade plants when my first one got too tall and began to tip over. Rather than just trimming it and tossing the cuttings, I decided to try growing new plants. Now I have jade plants all over my house, and I’ve given many as gifts to friends.
Best Time to Take Jade Plant Cuttings
Timing matters when it comes to successful jade plant propagation. Let me share when to take your cuttings for the best results.
Spring and early summer are ideal times to take cuttings from your jade plant. During these seasons, the plant is actively growing, which means your cuttings will root faster. The warm weather and longer daylight hours create perfect conditions for new growth.
However, you can take cuttings at other times too. I’ve successfully rooted jade cuttings in fall and winter, but they took longer to develop roots. If you live in a warm climate or can provide grow lights and stable temperatures, time of year matters less.
Avoid taking cuttings when your plant is stressed. Signs of stress include:
- Dropping leaves
- Soft, mushy parts
- Unusual spots or marks
- Very dry, shriveled leaves
Wait until your plant looks healthy before taking cuttings. A stressed plant will produce stressed cuttings that may not survive.
The time of day can matter too. I prefer taking cuttings in the morning when the plant is well-hydrated but not too full of water. Mid-day cuttings sometimes wilt faster in my experience.
Last year, I took cuttings from the same jade plant in April and November. The April cuttings rooted within three weeks, while the November ones took almost two months. Both worked, but spring propagation was clearly more efficient.
Tools You’ll Need for Taking Cuttings
Having the right tools makes jade plant propagation much easier and more successful. Here’s what you’ll need:
Essential Tools:
- Sharp scissors or pruning shears – Dull tools can crush the stems instead of making clean cuts
- Rubbing alcohol (70%) – For sterilizing your cutting tools
- Paper towels or a clean cloth – To lay out cuttings while they callus
- Small pots – For planting rooted cuttings
- Well-draining soil mix – Cactus or succulent mix works well
- A shallow dish – Optional, for leaf propagation
I keep a special pair of small pruning shears just for my houseplants. I clean them with alcohol before and after each use to prevent spreading any plant diseases.
Beyond these basics, some optional items can be helpful:
- Rooting hormone powder – Can speed up root formation (though jade plants often root well without it)
- Clear plastic cups – Work well as mini-greenhouses for leaf cuttings
- Plant labels – To mark when you took the cuttings
- A spray bottle – For lightly misting soil once roots begin to form
Before I start cutting, I gather all these supplies. This way, I can focus on making precise cuts without rushing to find what I need afterward.
Types of Jade Plant Cuttings
You can propagate jade plants in a few different ways. Let’s look at the main types of cuttings you can take:
Stem Cuttings
Stem cuttings are the most common and usually most successful method. You cut a stem segment that’s 2-4 inches long. These root readily and grow into new plants quickly.
Leaf Cuttings
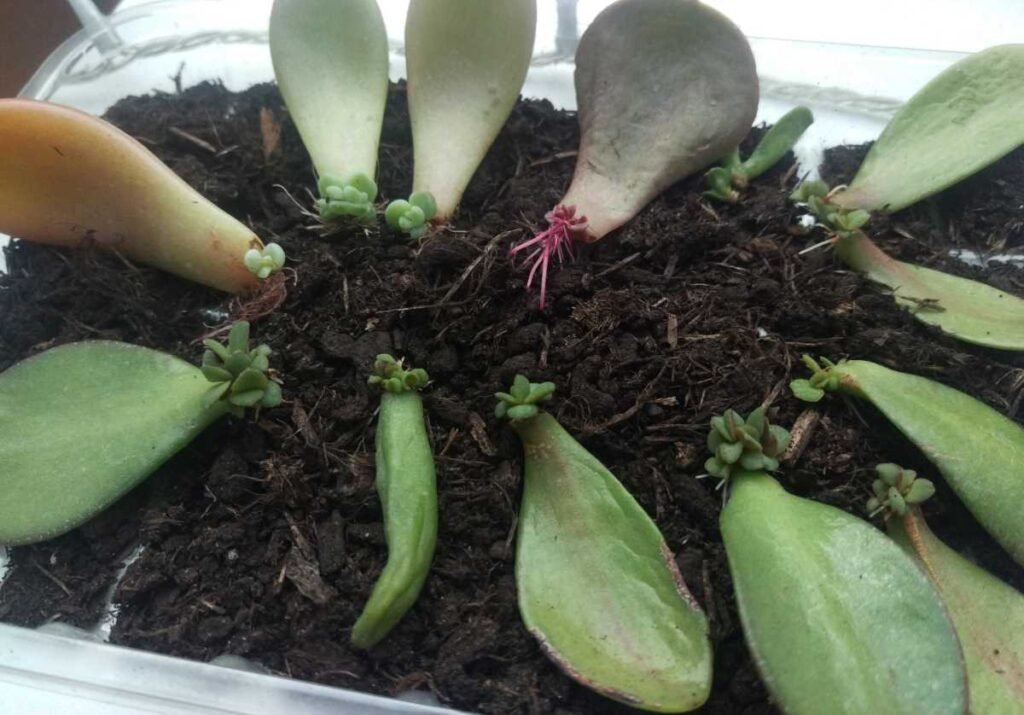
Single leaf cuttings can also grow into new plants. Simply remove a healthy leaf from the stem. While leaf cuttings take longer than stem cuttings to develop into full plants, they’re a great way to maximize propagation, especially if you have limited material to work with.
Branch Cuttings
Larger branch cuttings are essentially bigger stem cuttings. These work well when pruning a large jade plant. They develop into larger plants faster than small cuttings but may take longer to root.
I typically use stem cuttings for most of my jade propagation. However, when I’m pruning my plant, I save healthy leaves for leaf propagation too. Why waste any part that could become a new plant?
One time, a large branch broke off my jade plant when it fell during a move. I cut it into three sections and propagated all of them. Now I have three good-sized plants from what could have been a total loss.
How to Take Stem Cuttings: Step by Step

Now let’s get into the details of how to take stem cuttings properly. This is the most reliable method for jade plant propagation.
Step 1: Choose the Right Stem
Look for healthy stems that are:
- Green and firm (not soft or wrinkled)
- At least pencil thickness for best results
- Not flowering (flowering stems use a lot of energy)
- Without damage or disease spots
I look for stems that are slightly woody at the base but still have plenty of green growth. These mature-but-not-old stems tend to root best.
Step 2: Sterilize Your Tools
Before cutting, wipe your scissors or pruning shears with rubbing alcohol. This helps prevent infections in both the mother plant and the cutting.
Step 3: Make the Cut
Cut the stem cleanly at a 45-degree angle. Make your cut:
- Just below a leaf node (where leaves emerge from the stem)
- At least 2-4 inches from the tip of the stem
- With one quick, clean motion (avoid sawing)
The angled cut increases the surface area for root development. It also helps you remember which end should go into the soil.
Step 4: Remove Lower Leaves
Strip off the leaves from the bottom 1 inch of the cutting. This gives you a clean stem section to plant and reduces moisture loss. Save these removed leaves for leaf propagation if they’re healthy.
Step 5: Let It Callus
This is critical! Place your cuttings in a dry, warm place out of direct sunlight for 3-7 days. During this time, the cut end will form a callus, which helps prevent rot when you plant it.
Skipping the callusing step is the most common mistake I see new propagators make. I once planted jade cuttings right away without callusing, and nearly all of them rotted. Now I always wait at least 3 days, and my success rate is much higher.
How to Take Leaf Cuttings
Leaf propagation works well with jade plants too. Here’s how to do it right:
Step 1: Select Healthy Leaves
Choose leaves that are:
- Plump and firm
- Fully mature (not tiny new growth)
- Without spots or damage
- From anywhere on the plant
The best leaves for propagation are the medium to large ones from the middle sections of the plant.
Step 2: Remove the Leaf Properly
This is key! You need a complete leaf with the base intact. Here’s how:
- Hold the leaf at its base
- Gently wiggle it side to side
- Apply slight downward pressure until it pops off cleanly
You want that tiny bit of stem where the leaf connects. If you just cut or tear the leaf, it probably won’t grow roots.
I use a gentle twist-and-pull motion that usually gives me a clean break with the leaf base intact.
Step 3: Callus the Leaves
Just like with stem cuttings, let leaf cuttings callus for 2-3 days in a dry place. Leaves callus faster than stems because they’re thinner.
The first time I tried leaf propagation, I misted the leaves daily, thinking they needed water. This was wrong! They need to dry out first to form a protective callus.
Preparing Cuttings for Planting
After your cuttings have callused, they’re almost ready for planting. But first, you may want to consider a few optional steps:
Optional: Apply Rooting Hormone
While jade plants often root readily without help, rooting hormone can speed up the process:
- Dip the callused end in water
- Tap it into rooting hormone powder
- Shake off any excess
I’ve propagated jades both with and without rooting hormone. In my experience, it speeds up rooting by about a week but isn’t necessary for success.
Optional: Let Roots Form Before Planting
Some people prefer to let roots form before planting:
- Place the callused cutting just above water
- Wait for roots to appear (1-3 weeks)
- Then plant in soil
I’ve tried this water propagation method but prefer planting directly in soil after callusing. I find soil-grown roots are stronger and adapt better.
Prepare Your Containers
While waiting for callusing, prepare your planting containers:
- Choose small pots with drainage holes
- Fill with well-draining cactus/succulent soil
- Consider adding extra perlite for better drainage
Last year, I experimented with different containers and found that small terra cotta pots worked best for jade cuttings. The porous material helps prevent overwatering.
Planting Your Jade Cuttings
Now it’s time to plant your callused cuttings. Here’s how to do it right:
For Stem Cuttings:
- Make a hole in the soil with a pencil or your finger
- Insert the cutting about 1 inch deep (or enough to stand upright)
- Gently firm the soil around the base
- Do NOT water immediately
The soil should be completely dry when you plant. Wait at least 3-7 days before the first watering to further reduce rot risk.
For Leaf Cuttings:
You have two options for leaf cuttings:
Option 1 – Lay on soil:
- Prepare a shallow tray with well-draining soil
- Lay the callused leaves flat on top of the soil
- Place the tray in bright, indirect light
- Wait several weeks for tiny roots and new plants to form at the leaf base
Option 2 – Insert leaf base:
- Push the callused end of the leaf slightly into the soil
- Leave most of the leaf above the soil
- Support the leaf with a small stone if needed
For leaf cuttings, I prefer the laying method. I’ve had better success with it, and it’s easier to see when new growth starts.
Initial Care After Planting
The first few weeks after planting are critical. Here’s how to care for your new cuttings:
Light
Place newly planted cuttings in bright, indirect light. Morning sun is fine, but avoid harsh afternoon sun until they’re established.
Water
Hold off on watering for the first week after planting. Then:
- For stem cuttings, lightly water around the edges of the pot (not directly on the stem)
- For leaf cuttings, use a spray bottle to mist the soil surface
After the initial watering, only water when the soil is completely dry. Overwatering is the number one killer of jade cuttings.
Temperature
Keep cuttings in a warm place, ideally 65-75°F (18-24°C). Avoid cold drafts or hot, dry air from heaters.
I keep my new cuttings on a bright windowsill that gets only morning sun. I’ve found that too much light can stress them before they have roots, but too little light leads to weak growth.
Signs of Successful Rooting
How do you know if your cuttings are rooting? Look for these positive signs:
- New growth – Tiny new leaves forming at the top of stem cuttings or the base of leaf cuttings is the best sign of successful rooting.
- Resistance when gently tugged – After a few weeks, very gently tug on your cutting. If you feel resistance, roots have likely formed.
- Plump, firm appearance – Rooted cuttings maintain their plump look, while failed cuttings often shrivel.
- Cutting remains upright – Once roots form, the cutting will stand firmly in the soil without leaning.
My jade cuttings typically show signs of new growth within 3-6 weeks. Stem cuttings root faster than leaf cuttings. In fact, leaf cuttings can take months to develop into a new plant with roots.
Troubleshooting Common Problems
Even with perfect technique, problems can arise. Here are solutions to common jade cutting issues:
Problem: Cutting turns black at the base
Cause: Usually rot from planting before proper callusing or overwatering Solution: Take a new cutting and ensure proper callusing time before planting
Problem: Cutting shrivels without rooting
Cause: Dehydration or too much direct sunlight Solution: Move to slightly less bright spot and try very light misting around (not on) the cutting
Problem: Cutting stays firm but never grows roots
Cause: Often too little light or too cold temperatures Solution: Move to brighter spot and ensure warm conditions (at least 65°F/18°C)
Problem: Leaf cuttings grow roots but no new plants
Cause: Sometimes just bad luck – not every leaf forms a new plant Solution: Try more leaves and ensure they’re healthy with the base intact
I once had a whole batch of cuttings rot because my soil mix retained too much moisture. Now I add extra perlite to my succulent soil for propagation, and my success rate is much higher.
Moving Rooted Cuttings to Their Permanent Homes
Once your cuttings have developed strong roots and new growth (usually 2-3 months after planting), they’re ready to be treated as new plants.
For stem cuttings, you can:
- Keep them in their starter pots for about a year
- Move them to slightly larger pots once they’re well-established
- Begin normal jade plant care routines
For leaf propagations, wait until the new plant is at least 1 inch tall before moving it to its own small pot.
When repotting newly rooted cuttings:
- Handle them very gently as the roots are still delicate
- Use well-draining soil mix
- Choose a pot only slightly larger than the root ball
- Wait a week before watering after repotting
I like to keep my new jade plants in small pots until they’re quite established. This helps prevent overwatering and gives them time to develop strong root systems.
Creative Ways to Display Multiple Cuttings
One of the joys of propagation is creating beautiful displays with your new plants. Here are some ideas:
Group Planting
Plant several rooted cuttings together in one larger pot to create a fuller, bushier plant right from the start.
Jade Forest
Plant multiple cuttings of different heights in a shallow, wide container to create a miniature jade “forest.”
Varied Container Garden
Plant individual cuttings in different small containers and group them together on a tray or shelf.
Growth Timeline
Keep cuttings taken at different times together to show the progression of growth stages.
I created a “jade family” display with the mother plant surrounded by offspring of various ages. It’s a living timeline of my propagation journey, and visitors always comment on it.
Special Techniques for Bonsai-Style Jade Plants
Jade plants make excellent bonsai subjects. If you’re interested in creating a jade bonsai, propagation is a great starting point.
When taking cuttings for bonsai:
- Choose thicker, more mature stems with some woody development
- Take larger cuttings (6+ inches) that already show some trunk character
- Look for natural bends or interesting shapes in the stems
For bonsai development:
- Pot in shallow bonsai containers after roots are well-established
- Begin training and pruning once the cutting has been growing strongly for several months
- Use wiring with extreme caution as jade branches can snap easily
I started a jade bonsai from a cutting four years ago. By selecting a cutting with an interesting natural curve and keeping it in a shallow pot, it already has the look of a miniature tree.
Seasonal Considerations for Cutting Jade Plants
While spring and summer are ideal for taking cuttings, you can work with the seasons to maximize propagation success.
Spring Actions:
- Take most of your cuttings as growth resumes
- Prune and shape the parent plant
- Plan for maximum growth during the upcoming warm months
Summer Actions:
- Take cuttings early in summer for good establishment before winter
- Provide bright light but protect new cuttings from intense heat
- Water more frequently as roots develop
Fall Actions:
- Take final cuttings early in fall to establish before winter dormancy
- Expect slower rooting as temperatures cool
- Reduce water as days shorten
Winter Actions:
- Focus on caring for existing cuttings rather than taking new ones
- Provide extra light to compensate for shorter days
- Keep cuttings away from cold windows and drafts
I plan my major jade pruning and propagation session for early April. This gives new cuttings the maximum growing season to establish before winter.
Tracking Your Propagation Journey
Keeping records of your jade propagation efforts can be both fun and educational. Consider tracking:
- Dates when cuttings were taken
- Methods used (leaf vs. stem, soil vs. water)
- Time until rooting
- Success rates under different conditions
I keep a simple plant journal where I note when I take cuttings and when they show signs of growth. Over time, this has helped me identify the best techniques for my specific growing conditions.
Photos taken every few weeks can create a wonderful visual record of growth. Looking back at pictures of tiny cuttings that are now full plants brings real satisfaction.
Conclusion: The Joy of Jade Propagation
Cutting jade plants for propagation isn’t just about getting more plants for free. It’s about connecting with the natural growth cycle and developing your skills as a plant parent.
The process teaches patience as you wait for callusing, rooting, and new growth. It rewards careful observation as you learn to identify the best stems and leaves for cutting. And it builds confidence as you successfully turn small cuttings into thriving new plants.
I started with one small jade plant seven years ago. Through propagation, I now have more than twenty jade plants of various sizes throughout my home. Each one represents a moment in my plant journey and carries a bit of history from the original plant.
Remember that propagation success improves with practice. Don’t be discouraged if your first attempts aren’t perfect. Each cutting teaches you something new about these remarkable plants.
So grab your clean scissors, find a healthy stem on your jade plant, and take that first cut. A new plant is waiting to grow!
What’s your experience with jade plant propagation? Have you tried different methods? The joy of propagation is that there’s always something new to learn and try.

My name is Shahriar Robin, and I’m the creator of JadePlants.org. Growing up in a village, I developed a deep connection with nature from a young age. Plants and gardening have always been a part of my life, and jade plants, with their resilience and elegance, have held a special place in my heart. Over the years, I’ve learned so much about these fascinating plants, and I created this site to share that knowledge with you—completely free of charge.